


Kick Out Diverter Flashing
Kick Out Flashing Is Needed On Your San Antonio Area Home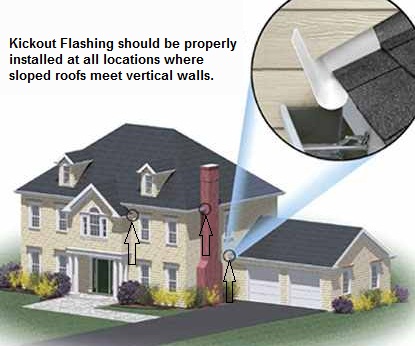 Kickout diverter flashing is needed and recommended where a sloped lower roofline terminates against a vertical wall, chimney chase or framed column. When flashing, one of the home or buildings biggest potential leak areas is where the eave (cornice) meets the vertical wall. It is best to err on the side of caution to control the flow of rain water and prevent leaks. Kick out flashing should be installed above the rain gutter, drip edge flashing and/or roof edge shingle mold where the roof meets the vertical wall or projection whether there are gutters or not. The term shingle mold is used even when other than shingle type roofing materials are present. Shingle mold is usually a 1x2 or 1x4 trim fastened to the fascia material at the edge of roofing. Shingle mold in some cases takes the place of metal drip edge or vise versa. In some cases both are installed. At least one or the other is there at the edge of your roof, fastened to the fascia whether you have gutters or not. Kickout flashing helps with or without gutters. The 2009 Internation Residential Code (IRC) has a section detailing side wall flashing: " At the end of the vertical side wall the step flashing shall be turned out in a manner that directs water away from the wall and onto the roof and/or gutter."
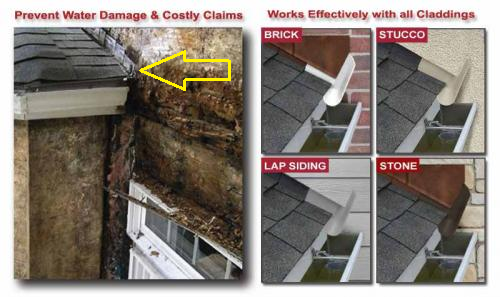
The way homes are currently being built, they are most likely not as aired out, breathable as homes once were. In less breathable homes, water has an easier time penetrating the building exterior and has a tougher time leaving it. As a result, newer homes are more likely to suffer water damage more so than older homes. Kick-out flashing is more important than ever to divert rain water away from the exterior wall cladding, to protect the inside of the wall and framing along with protection from excessive moisture intrusions causing damage to the interior of the home or building. KICK-OUT FLASHING IMAGES Yellow arrow above shows the area that proper kickout flashing was needed and not present. Images to right show the proper installation of kickout flashing at different types of exterior wall claddings, including brick, stucco, siding and stone. Siding and stucco wall flashing is behind the cladding while the flashing on stone and brick leading to the kickout is on the exterior of the cladding and should have a counter flashing over the base flashing. See images below: By Joe Keresztury - JWK Inspections Photos and images by JWK Inspections, Dryflekt, Code Check Complete and InterNACHI 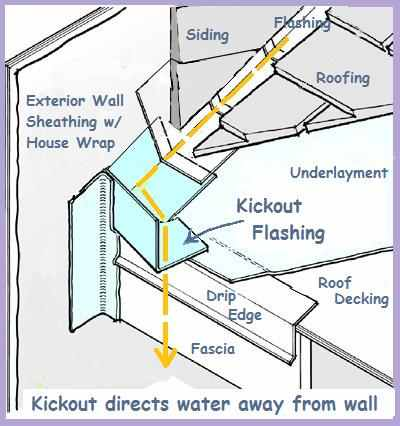 Kickout flashing also referred to as diverter flashing kicks out rain water and diverts it away from the lower wall below the roof line. Without properly installed kickout diverter flashing rain water can penetrate in behind the siding or masonry and get trapped inside the wall. The lack of kickout flashing or incorrectly installed kickout flashings are often the source of major structural problems, mold issues, rot damage and can be the feeding ground for termite infiltration. Omitting the needed kick out flashings almost always leads to in many cases serious damage inside the enclosed wall and wood framing behind the exterior cladding. Sometimes this damage is totally concealed until the exterior is opened up or until major signs become apparent.
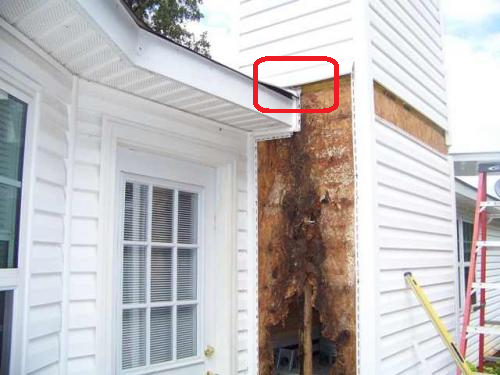
This image shows damage caused by the lack of proper kickout flashing at the necessary area which is marked above in red. Rain water was not diverted away and excessive moisture seeped inside the wall causing excessive damage inside of it.
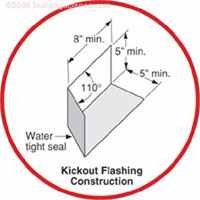 Kickout diverter flashing should never be installed at less than a 110 degree angle. Any seams at joints, connections should be properly fastened and sealed.
New products are available for the ever present concerns of having proper kickout flashing. 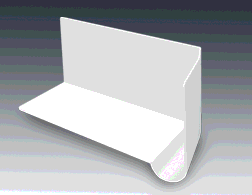 A pre-formed kickout flashing product is available by Dryflekt. View product info @: http://www.dryflekt.com/
Locally Dryflekt products are available thru ABC Supply of San Antonio.
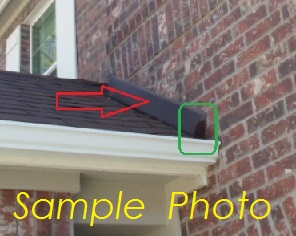
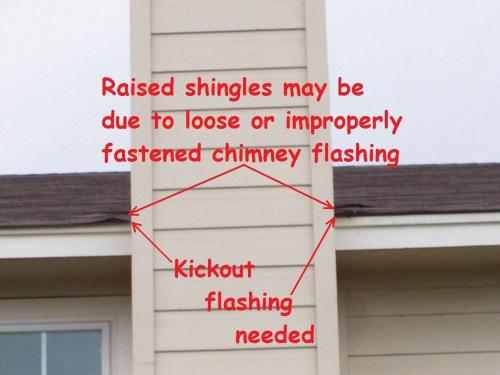 As seen in this photo at a San Antonio area Home Inspection, kickout flashing is lacking and needed where the roofing and the cornice of the home meet the chimney chase.
The San Antonio area Home Inspection (below) in the Leon Valley area shows a lack of proper kick out flashing along with a gap behind the minimal flashing present as seen at the yellow arrow. 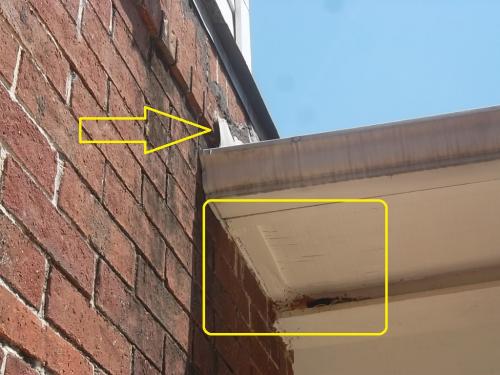 This situation is not helped by the deco projected course in the brick which also has an unsealed gap behind improperly installed flashing. Repairs have been attempted as seen by the streaks of black from roofing tar that was applied. The yellow squared area in photo does show the deterioration, rotting due to the improper flashing in the area above.
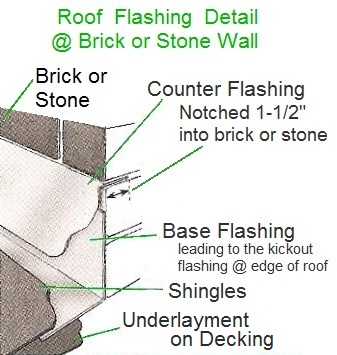
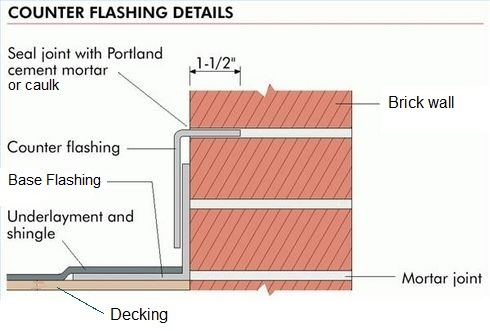
Images show proper roof flashing at masonry over roofing.
Photos show flashing at roof to exterior cladding, at left is counter flashing at masonry that ties into the kickout flashing at the roof edge. At right shows the base flashing at siding over the roof tying into the kickout flashing. Siding is up 2" above roof surface as needed. Flashing is under siding as needed and also goes under stucco type cladding. Siding and stucco serve as the counter flashing over the base flashing. The photo at right with siding is before roof materials were installed. The shingles as were to be used on this house will go over the bottom area of flashing that is on decking after underlayment was first installed. 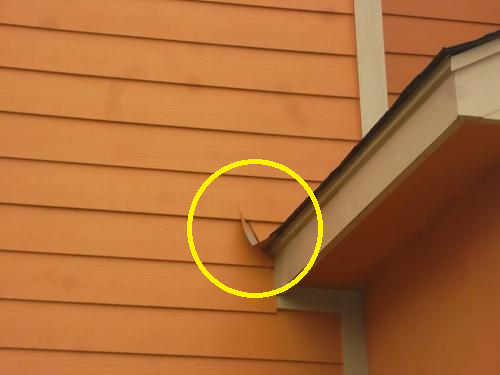
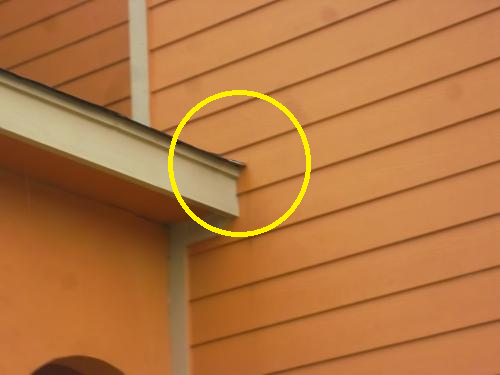
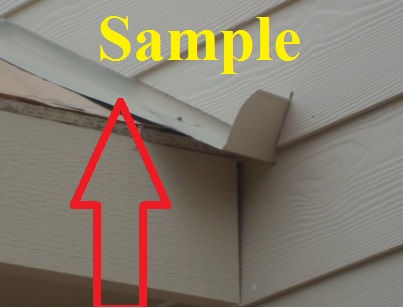
Photos above show a San Antonio property with kickout flashing present at left side area around porch but not at the right side.
In conclusion, kickout flashing should be present and properly installed in order to direct rain water away from the exterior cladding and prevent moisture intrusion inside the enclosed wall areas and even into the home. A Home Inspector should know where proper flashing, including the important kickout (diverter) flashing should be located and what common defects to look for while inspecting a home's exterior relating to it.
.
San Antonio Home Inspector, New Home Construction Specialist
and Commercial Property Inspector


Post new comment